Creating Plus 1% system Users is an important concept that Administrators need to be comfortable with and should not be confused with giving access to athletes and team managers access to the Portal which is managed under the Portal Menu. You create Plus1% system users on an individual basis and should be limited to only those people who need access your database .
Learn how to create a system user with the following steps:
Setup a Plus1% System User
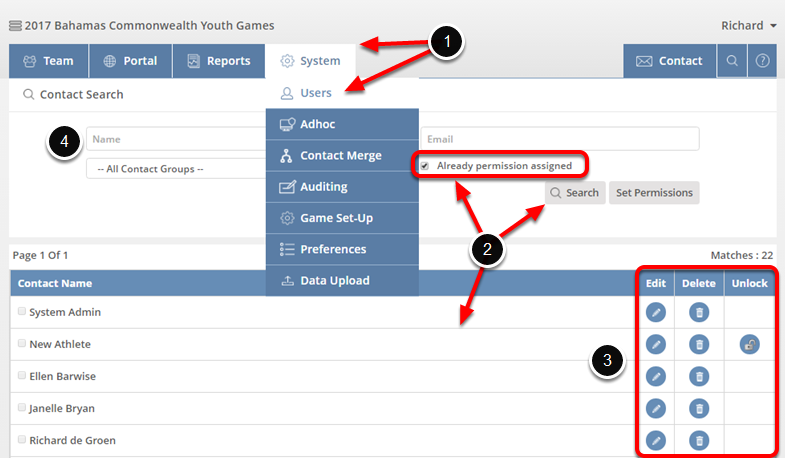
- The user tool can be found under the ‘System’ menu and ‘User’. A Search screen will appear enabling you find and manage system users
- The first step would be find out if the person you want to be a systems user is already a systems user. Click the check box ‘Already permission assigned’ and then search. This will return all the people who have been setup with access to your Plus1% system.
- You can edit a users settings, delete users and unlock users from this screen. A locked account occurs when someone has attempted to login multiple time and failed. This then initiates a system lock-out and the padlock must be clicked to unlock that users account.
- If the person you want to give access to is not already a systems user then you can search the database to find the contact you want to give access to.
Example of a Search

- Once the person is identified in the list, tick the check box
- Click ‘Set Permission’
Setting Permissions

A dialog box will pop open with a list of permissions you can set for a user. In the example above this is a full administrators setting giving access over the entire system.
- System Administrator gives access to the ‘System’ menu and all the sub menus under ‘System’ including setting up systems users.
- Games Access, every user MUST have access to at least one Games. You can give user access to all Games, one Games or select multiple Games. The whole of the Plus1% system and core logic is based on choosing a Games when you login or if you only have one Games then going straight into that Games when you login. You cannot enter the system without being in a Games. In the rare event that you have people who need to access the Plus1% system but you do not want them to have access to any Games data then you will need to create a ‘dummy’ Games and give them permission to that Games.
- The first 12 modules relate to the 12 tabs on a team members dialog box. If you untick a module then the tab will not be visible to this user on the dialog box.
- In addition to removing the tabs from the dialog box, these module (Sport, Accreditation, Outfitting, Travel and Housing) will be removed from the sub menus under Team menu
- Portal and Reports will remove the top menus if unticked
- Games Setup will be removed under the Team submenu if unticked
Difference between View, Admin and No Access
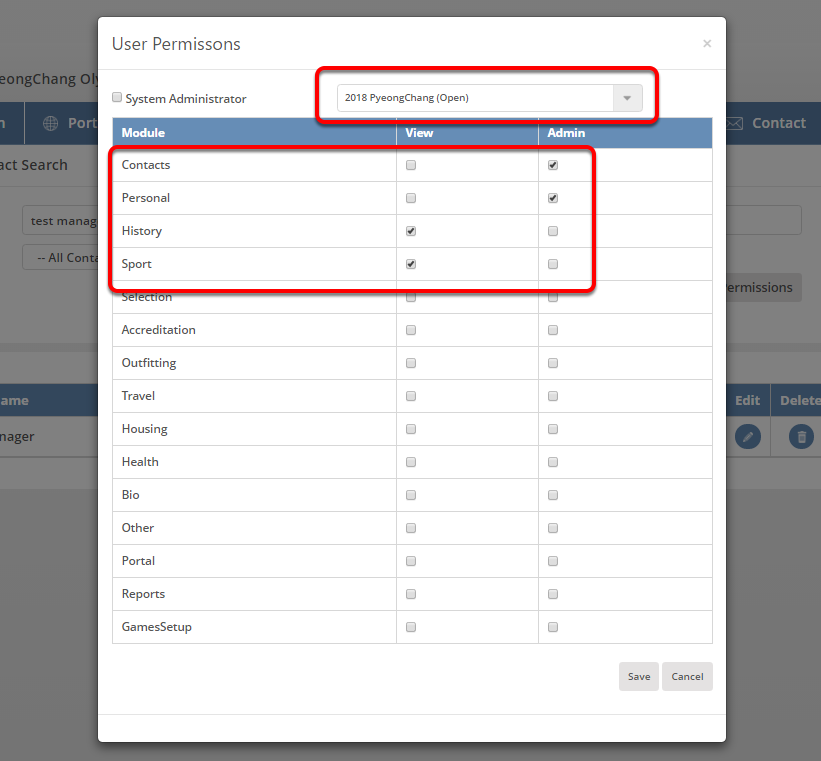
In the example above the user would only have access to the PyeongChang 2018 Games and would not see the System, Portal or Reports top menus. They would have access to Team and Contacts in the top menu. Under Contacts they would be able to search and access the dialog box for all contacts in the database. When the dialog pops open the would see 3 tabs – Contacts, Personal and History, the sport tab is only available from Games. They could change any data in the Contacts and Personal area. They would see the data in History as they have only a view permission – they could not make any changes.
Test Managers view when logged in and viewing an athletes record

User Name and Password Generation

In the above example, when the Permission page is saved Plus1% will automatically generate an email to the person with there user name and a link to setup there password.
