The following article outlines the step-by-step process to set up your Plus1% site and then extract the data, accreditation photos and passport scans in bulk for submission to the Gold Coast 2018 Organising Committee. It has been updated to take into account the new data fields required by GOLDOC at the end of October and the adjustments have been highlighted in blue.
Plus1% has a specific report designed to match, as best as possible, the Gold Coast 2018 bulk upload template. Once you have collected all the necessary data, accreditation images and passport scans you will be able to run this report from the Accreditation Module in Plus1%, make some adjustments in the excel and then copy and paste this into the Gold Coast 2018 bulk upload template. If you have not received the bulk upload template from Gold Coast 2018 then you should contact your CGAs accreditation liaison person at the Gold Coast 2018 Organising Committee and request the bulk upload template.
This article is broken down into the following steps;
- Systems Setup – Adding ad hoc questions to identify para sport athletes and for the visa application – these should be put into a Group called Visa Information under the Bio Tab.
- Systems Setup – Setting up the accreditation photo file name and passport scan name
- Systems Setup – Check that the Document Type is set to PAS
- Systems Setup – Adding the Gold Coast Submission Report to the Accreditation Module
- Systems Setup – Adding the Accreditation Categories and Designations
- Maiden Names to be added to Previous Family Name
- Extract Data – How to Extract Data into ms Excel and Zip Accreditation and Passport Images
- Data Adjustment – Moving Given Middle Names into Separate Cells
8a. Find the Para-Sport/Discipline Ad Hoc Question in the Excel File and Cut and Paste this into Column F - Data Adjustment – Adding ALL to Sport against those officials who will have ALL SPORT on their accreditation card
- Data Adjustment – How to turn Passport Scan .pdf files into .jpg files
- Copy and Paste – Move your data into the Gold Coast 2018 Bulk Upload Template and Run the Error Checker
1. Adding Para Sport and Visa Ad Hoc Questions
The Plus1% template report for Gold Coast has numerous ad hoc question that need to be added to your site. The table below outlines all the Visa ad hoc questions along with the format that you will need to add to your site to enable the collection of extra data. Please ensure the order of your adhoc questions are same as per below. Question one is an explanation of the questions below for use on the Portal, it does not require answer options. Please add all questions to the Bio Section under the Group Visa Information including the para-sport question.
|
It is recommended that all questions are Games Specific – Gold Coast 2018 and all questions are in the same unique Adhoc Section (Bio) and Group (Visa Information). After you have collected the data you will need to adjust the Text – Multiline answers and put in the correct country code to match the country codes in the Goldoc Template.
**PLEASE NOTE** For the Character and Health Questions, you will need to adjust the adhoc question option to be “No” and “Yes” removing “I have nothing to declare” and “I have something to declare”.
To add the ad hoc question go to Ad Hoc writer under System and click Add Question


- Questions can be added to any tab
- You should create an ad hoc Group under Systems Code Tables (eg Visa Information) which will name the Accordion under the Sport Tab where this question will be found on an athletes record (dialog box)
- Questions should be Games specific question, they are required for future games

- To see the question you can now search for an athletes record under Team Search and open the dialog box, go to the Biot Tab
- Then go to the Accordion titled Visa Information
- Answer the question and click save. This data will now be populated on the Plus1% report that mirrors the Gold Coast 2018 template.
2. Setting Accreditation Photo File Name and Passport Scan Name
This will enable each accreditation photo and the passport scan to be renamed so the extracted named in the excel template will match the exact name of the file when downloaded from Plus1%. To set up the photo file names go to Team and down to Photo File Name.


- Under Accreditation Photo please choose a field from the drop down in Field 1 to name your image. In the example GivenName has been selected. In the box below Field 1 you can add in the separator between the fields, in the example it is an underscore “_”
- In Field 2 a second name can be added and in the example LastName has been selected from the drop down. In the box below you can name the type of file. This should be either .jpg or .jpeg and this will be the file extension added to all files.
- Under Passport Scan you can follow the same process as above.
- Please note that under Passport Scan the file extension is NOT required. This is because we can have either .jpg’s or .pdf’s as the passport scan and we cannot rename a .pdf as a .jpg – they are different file types. The Plus1% system will automatically add the correct file extension in the output.
- Save these settings
3. Check that the Document Type is set to PAS
The Document Type setting can be found under System, Games Setup and on the Code Table Tab in the Document Type drop down. Please adjust this to PAS which is the code required by Gold Coast in the field Identification Document Type. To adjust just click on the name.

4. Adding Submission Report to the Accreditation Module
There are 3 steps to this process. First is to build the submission report in report and save it. Then you will attach this report to the Accreditation Module in the Games Setup. You can then run the Submission Report against your data in the Accreditation Module. To set up the report go to Reports, then Report Writer and across to the tab Submission and select the Gold Coast Accreditation Report Type.

The report is already formatted and in the correct order except for ad hoc questions, these will need to be placed in the order above and then slected in the ad hoc question section of report. All that is required is for you to check every tick box on the page, select the correct ad hoc questions and then save and name the report eg Gold Coast 2018

Select the ad hoc questions using the multi-select

You can run the report from here however there are limited filters. It is better to run the report from the accreditation module where you can utilize all the filters in this module. In order to link this report we need to attached the report to the accreditation module. To do this we need to go to the Games Setup and into the Details area.

- When you click on the Edit button it will open the details above. Select under Report Type “Gold Coast Accreditation” and then under report Gold Coast 2018 or the name you gave your report. Save this and it will attach this report to the Gold Coast 2018 Games Accreditation Module.
Now go to the Accreditation Module under the Team menu and you will see that the Submission Report at the bottom of the page is now active and it will run the data that is filtered on the screen.

5. Adding the Accreditation Categories and Designations
In the screen shot above you are able to allocate the Accreditation Categories and Designations to your team members. You must allocated both a designation and a category. The Category will be the Main Function code for the submission report.
To setup the categories and designations you can click on the setup or go to Games Setup and on the Tabs you will find categories and designations.


The following are the Main Function codes for submission which should be input into Categories in Plus1%. These codes can be found on the 3rd tab of the Gold Coast 2018 Bulk Upload Template.
Category Code = Main Function
AA01, Aa – Athlete
AB01, Ab – Guide
AB02, Ab – Pilot
AB03, Ab – Director
P01, P – Reserve Athlete
P02, P – Training Partner
P03, P – Personal Coach
AO01, Ao – Team Official
AO02, Ao – Press Attaché
AO03, Ao – Administrative Personnel
AM01, Am – Doctor
AM02, Am – Physiotherapist
AM03, Am – Medical Personnel
AC01, Ac – Chef de Mission
AC02, Ac – General Team Manager
AC03, Ac – Team Attache
AC04, Ac – Aide to the Team Attache
AC01A, Ac** – CdM Accomp Guest
AC02A, Ac** – GTM Accomp Guest
CGA01, CGA – President
CGA02, CGA – Secretary General
CGA01A, CGA** – Pres Accomp Guest
CGA02A, CGA** – Sec Gen Accomp Guest
CGAGI03, Gi – CGA Nominee
CGAGT01, Gt – Special Guest (TFR)
6. Maiden Names to be added to Previous Family Name
In Plus1% we store Maiden Name and Previous Name in 2 separate fields meaning we were forced to choose either one or the other as both fields could have data. We decided on Previous Family Name so therefore you will need to ensure anyone with a Maiden Name also has this data in the Previous Family Name field. This can be done by running a report that extracts all the Maiden Names with the Contact Name and Previous Family Name fields. Where the Previous Family name is blank and data is contained in the Maiden Name then transfer the data in Plus1%. This can also be done via an AQEBUF.

7. Extract Data and Zip Images
We can now extract our data along with the accreditation photos and passport scans. This can be done in small sections e.g. by sport or as one large excel. Please note, if you extract the data and then make adjustments and add data into the excel, this data will not be in Plus1%. To extract the data go the Accreditation Module, filter by the selection status, by sport, by function or Accreditation Designation.

8. Moving Given Middle Names into Separate Cells
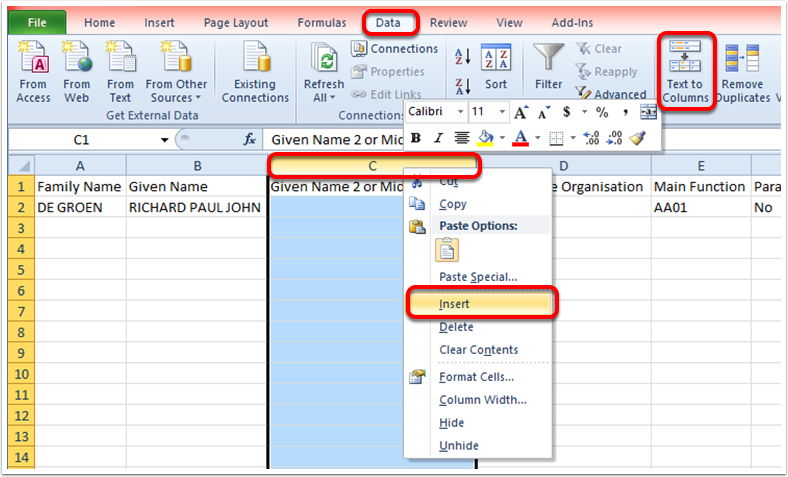
Open the excel sheet and it will contain only the data for the people you filter on the page above. You will now need to separate the second and third or more middle names in separate cells. This can be done using the Text to Columns tool in excel. The first step in this process is to add in some extra columns for the 2nd, 3rd, 4th and so on middle names to go it. So if you have RICHARD PAUL JOHN as the passport Given Name in column B then you will need to insert 1 additional column. If there were 5 Given Names the insert 3 additional columns. This can be done by highlighting column C and right clicking and then insert.
Once you have inserted sufficient columns you then highlight column B containing the Given Names. Click on the Text Column button and a wizard will open. We will Delimited tool to separate the fields. Click next.

Then click the Space check box and the results will be shown in the data preview.

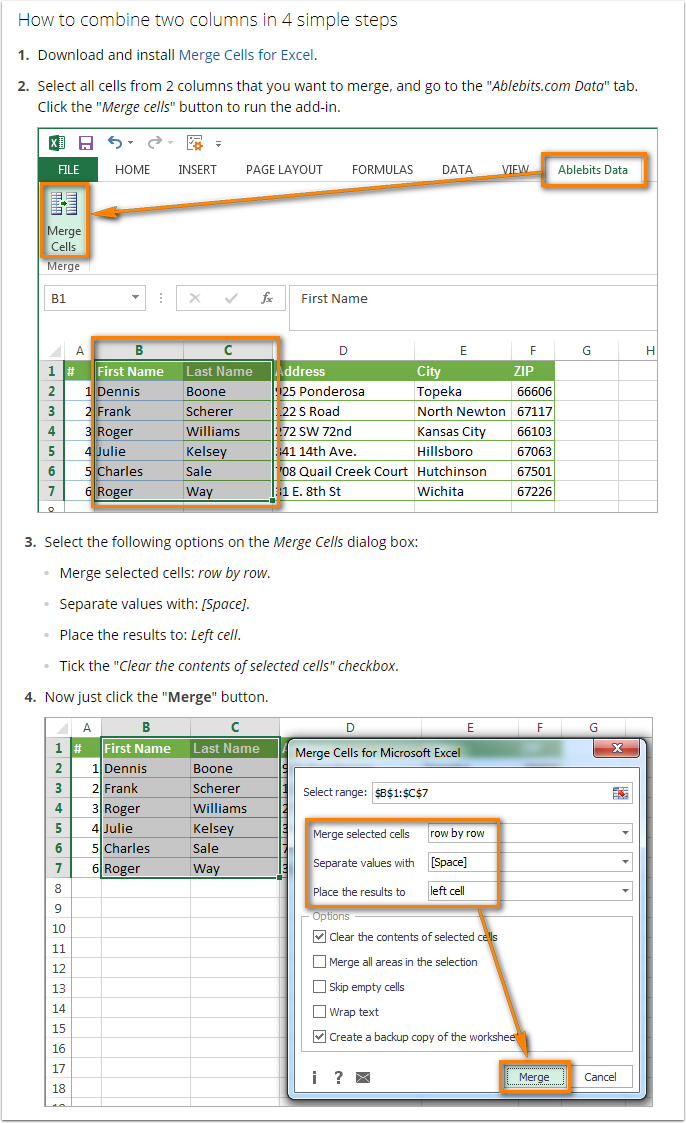
Now the data is split out into separate cells the simplest way to re-merge the 2nd and 3rd or more middle names into one cells is copy and paste however there is a simple to use tool available if you have lots of 2nd and 3rd names to merge together. This very cool tool can be found in this article by Ablebits and is the last example of how to merge cells without losing data.
To finish, copy the combined cells into the Given Name 2 field and deleted the blank columns.
8a. Find the Para-Sport/Discipline Ad Hoc Question in the Excel File and Cut and Paste this into Column F
Because of the changes made by GOLDOC to the submission report the ad hoc yes/no question relating to Para Sport athletes will now appear with all other ad hoc questions. If you have palced this question in the same Group as the Visa questions and it is the last question in the order, then this makes it easy to simply cut the column and paste it into the space created in column F for this data.
9. Adding ALL to Sport for Officials with ALL SPORT
Make sure you add in the words ALL against any Mission Staff official that has no sport allocated such as Chef de Mission, General Team Managers, Team Doctors or other Admin staff that are not in a sport.
10. How to turn Passport Scan .pdf files into .jpg files
Passport Scans that are .pdf will need to be converted into .jpg This will require you to download a converter tool and we have found a tool for this called Multi PDf Converter that we would recommend. It does require a the payment of a license fee but if you have lots of .pdf’s to convert then it could be well worth the investment.
